【仅供内部供应商使用,不提供对外解答和培训】
【仅供内部供应商使用,不提供对外解答和培训】
1.如何修改app的名字
如图,打开工程,在infoPlist.strings里面修改CFBundleDisplayName。分别对应( 英文,繁体中文,简体中文)

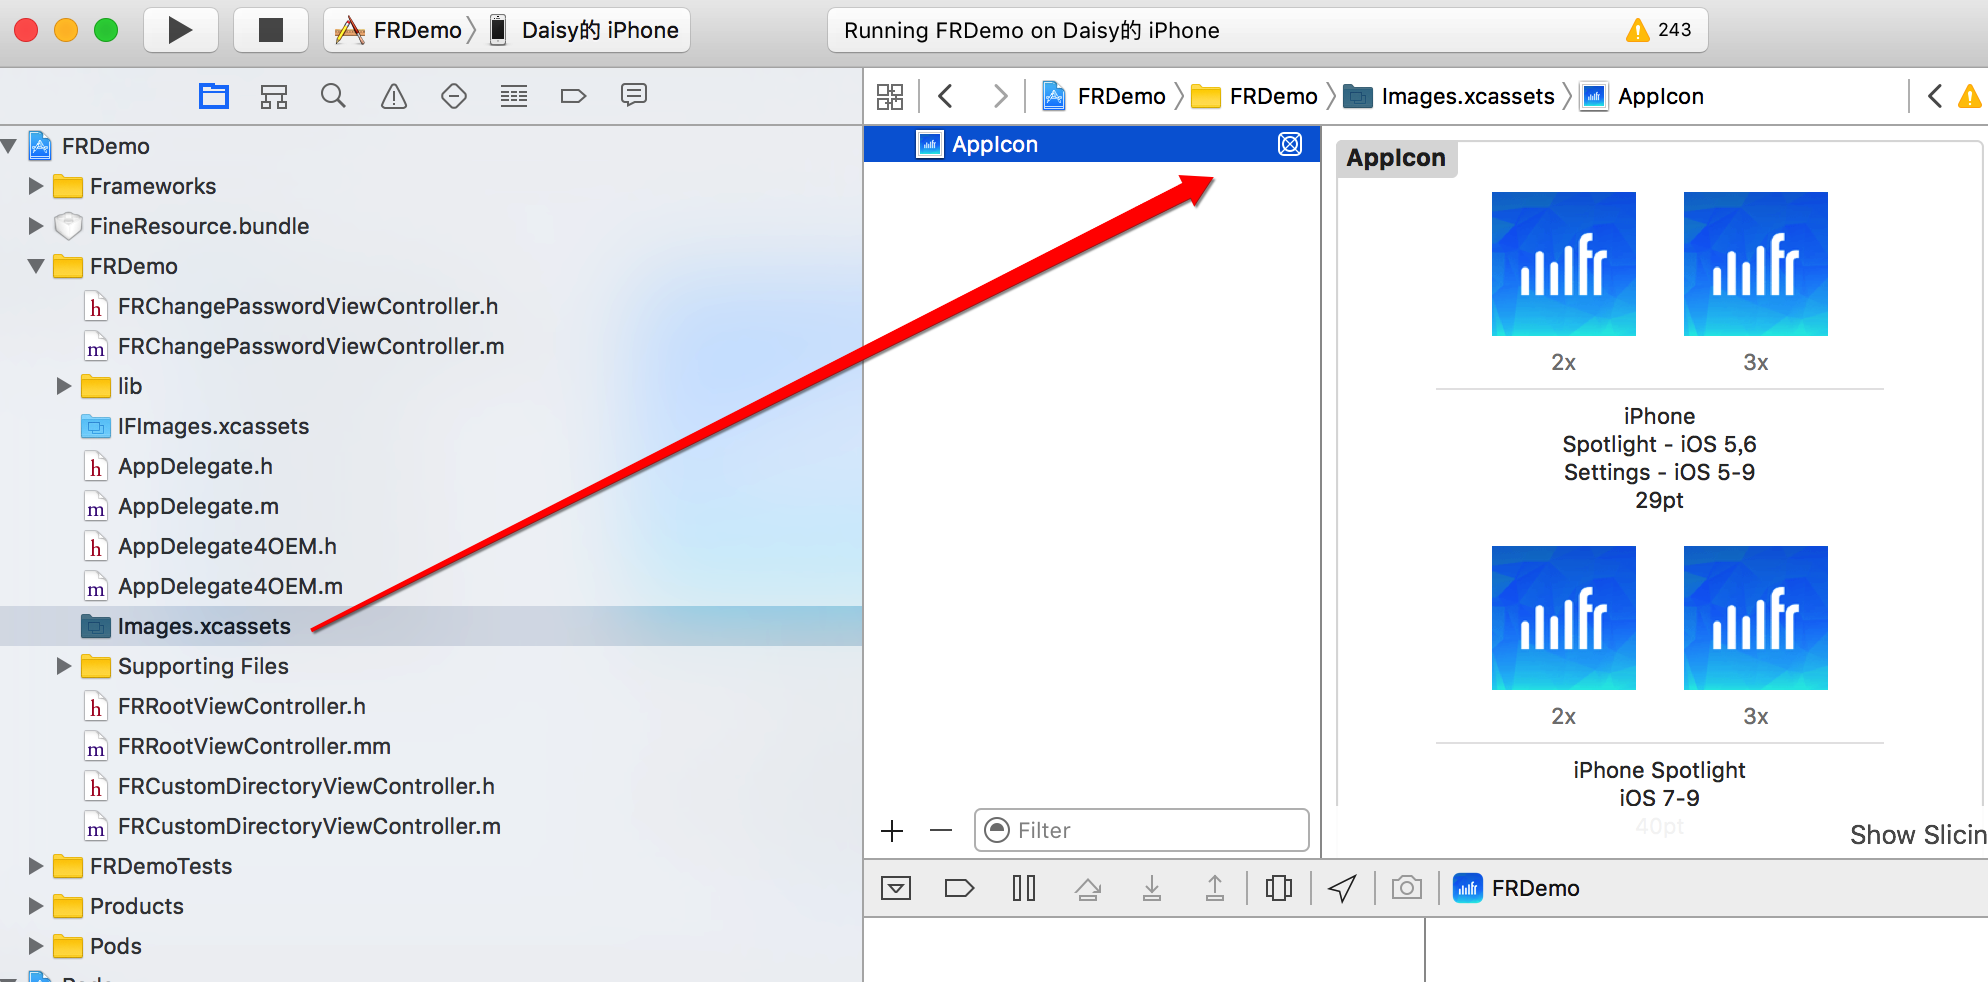
2.如何给app设置图标
如下图:选中imges.xcassets,点击appicon,会出现最右边的面板,将自己的图标拖入相应的2x,3x等框中即可
(ps:xcode里面2x,3x图的尺寸网上都可以查到,可参考链接:https://developer.apple.com/library/ios/qa/qa1686/_index.html)
3. 如何根据报表路径创建带有参数的报表?
[IFEntryViewController initWithPath:(NSString *)reportPath serverUrl:(NSString *)serverUrl viewType:(IFEntryViewType)viewType parameters:(NSDictionary *) params];
参数说明
| 参数名 | 参数说明 | 可否为空 |
|---|---|---|
| reportPath | 报表的路径,例如:@"mobile.test.cpt" | 否 |
| serverUrl | 报表所在的服务器地址 | |
| viewType | 预览类型。表单为nil | 是 |
| params | 报表传递的参数 | 是 |
4. 如果购买了决策系统,在移动端想查看决策系统的报表,又不想用FR默认的目录树结构,如何定制自己的目录树?
登录服务器
[IFIntegrationUtils logInto:DEFAULT_SERVERNAME serverUrl:url withUsername:username andPassword:password success:^{
    //第二步,登录成功,加载目录树
    [IFIntegrationUtils loadReportTree:^(NSArray *reportsArray) {
        //第三步,根据目录树和报表的树结构数组,创建自定义目录树,关于返回的数据结构在下面详细介绍。
    } failure:^(NSString *msg) {
    } isObj:YES];
} failure:^(NSString *msg) {
	//登录失败的处理
}];
下面详细介绍下服务器返回的目录树结构数组reportsArray:
reportsArray数组里的元素类型都是IFEntryNode;
IFEntryNode可以是文件夹,也可以是具体报表,可以通过方法[node isFolder]来判断;
如果node是文件夹,可以通过[node children]方法来获取文件夹下的子元素数组,仍然为IFEntryNode的数组对象;
如果node是报表类型,可以通过[[IFEntryViewController alloc] initWithEntry:node]的方式创建出报表视图控制器,并展示报表。
5. 如何获取决策系统里已经收藏的报表?
//第一步,登录服务器
[IFIntegrationUtils logInto:DEFAULT_SERVERNAME serverUrl:url withUsername:username andPassword:password success:^{
    //第二步,登录成功,获取收藏夹报表数组
    [IFIntegrationUtils favorites:^(NSMutableArray *favorites) {
    	//第三步,根据收藏夹报表自定义展示页面
    } failure:^(NSString *message) {
    }];
} failure:^(NSString *msg) {
}];
获取的收藏夹报表数组,一样全是IFEntryNode对象,可以采取一样的方式展示报表。6. 如何在集成的App里使用微信分享功能?
可参考微信开放平台中的iOS接入指南:
7. 怎么登出服务器?
[IFIntegrationUtils logout];
8. OEM定制的App,都支持定制哪些内容?
a. 因为OEM是一个新的工程,可以设置App的图标和名称,因此不需要调用额外的接口就能达到修改App图标和名称的目的;
b. 第一次打开App时,默认服务器列表的定制:
1.删除FR的默认服务器:[IFOEMUtils removeDemoServer];
2.增加一个默认服务器:[IFOEMUtils addServerWithName:(NSString *)serverName andURL:(NSString *)serverURL addUsername:(NSString *)username addPassword:(NSString *)password userEditable:(BOOL)userEditable];
参数说明| 参数名 | 参数说明 | 是否可以为空 |
|---|---|---|
| serverName | 服务器名称 | 否 |
| serverURL | 服务器地址 | 否 |
| username | 默认用户名 | 是 |
| password | 默认密码 | 是 |
| userEditable | 用户名、密码以及服务器名称地址是否允许用户修改 | 否 |
c. 关于页面的定制:
1.去除FR默认的关于页面:[IFOEMUtils removeAbout];
2.自定义关于页面上的信息:[IFOEMUtils setAppVersion:(NSString *) version];//设置版本号 [IFOEMUtils setCopyright:(NSString *) copyRight];//设置版权信息 [IFOEMUtils setAppIconName:(NSString *) iconName];//设置关于页面里的图标。
d. App内默认消息提醒样式的定制:FR内默认消息提醒采用顶部出现会自动消失的蓝色(正常提示消息)或红色(错误/警告消息)提醒消息。如果想使用符合自己App风格的提示消息,可以使用:
[IFOEMUtils setMessageHandler:(void (^) (NSString *message, BOOL isSuccess)) handler];
参数说明 | 参数名 | 参数说明 |
|---|---|
| handler | 消息处理函数 |
Block参数说明
| 参数名 | 参数说明 |
|---|---|
| message | 消息内容 |
| isSuccess | YES表示只是提示;NO表示错误/警告 |
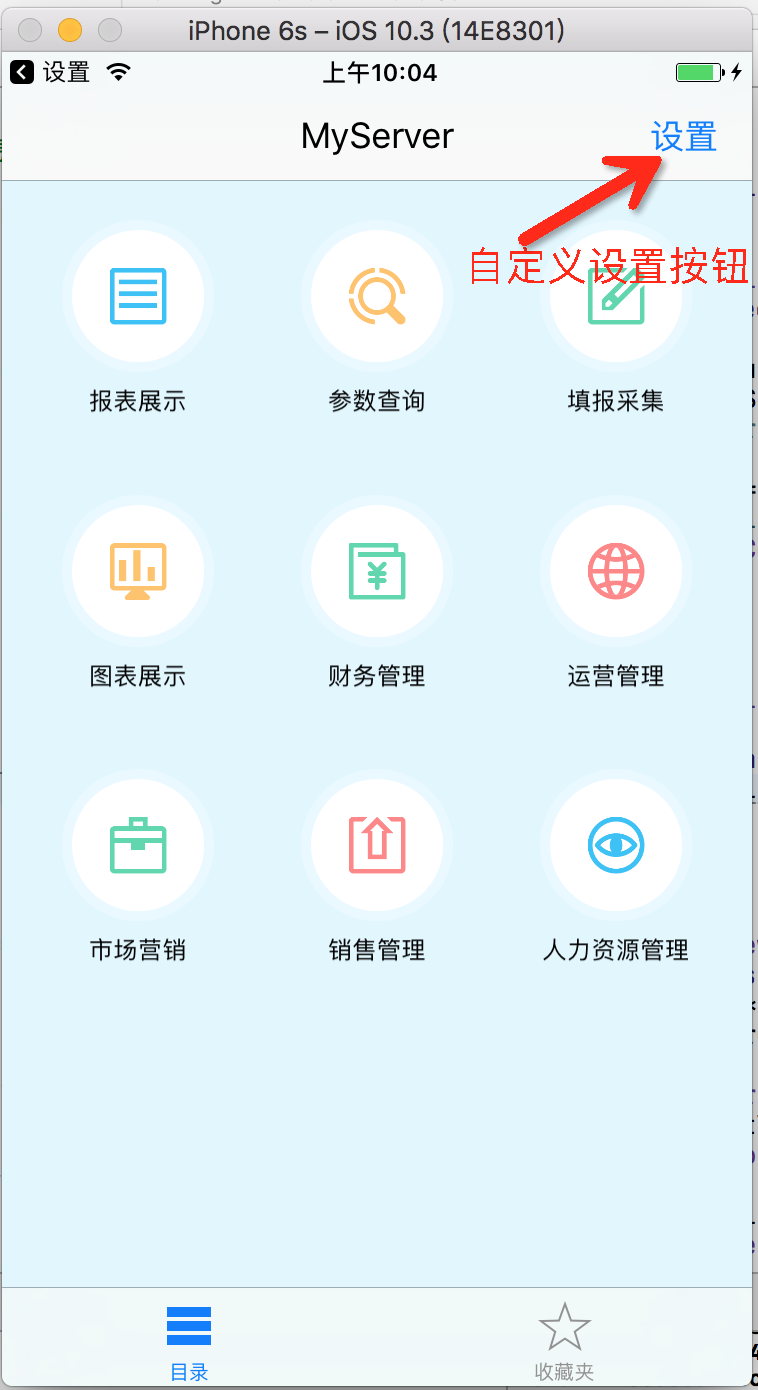
e. App右上角为设置按钮,支持放置自定义按钮:
[IFOEMUtils setAppSettingBarButtonItem:(UIBarButtonItem *) settingItem];
settingItem:设置按钮。
9. 集成时如何支持报表离线预览
首先,在AppDelegate中的didFinishLaunchingWithOptions方法创建离线所需要的数据库表:
[IFIntegrationUtils createTable];
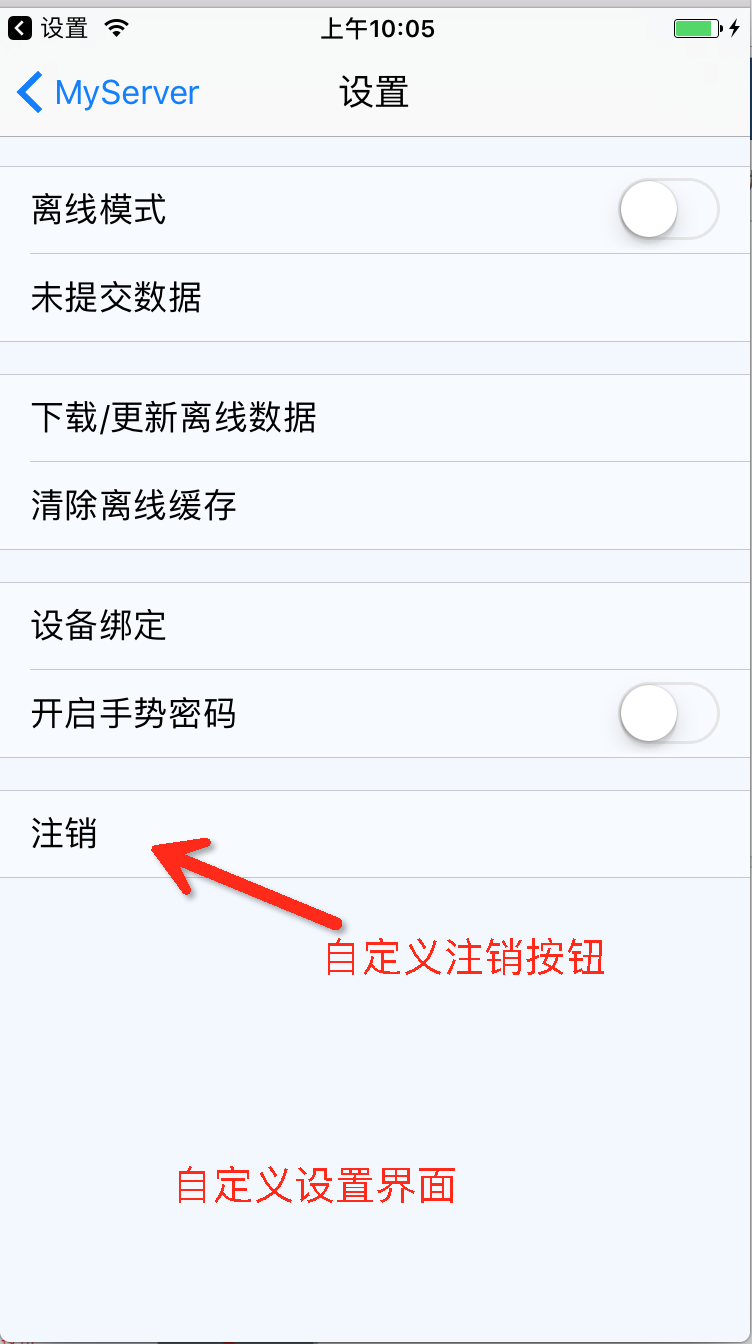
然后,使用第8个问题中,自定义右上角设置按钮的方式,创建自定义的设置按钮,点击事件打开FR内置的设置界面
IFFrameAppSettingViewController *settingViewController = [[IFFrameAppSettingViewController alloc] initWithCustomItems:customItems];
customItems:是个二维数组,设置界面中除了离线相关的按钮外,还可以自己添加按钮,元素类型为一组关联的设置按钮组,按钮类型为:IFFrameAppSettingItem。
例如:添加一个注销按钮:IFFrameAppSettingItem *logoutItem = [[IFFrameAppSettingItem alloc] initWithTitle:@"注销" andAction:^(UITableViewCell *selectedCell) {
[IFIntegrationUtils logOut];
[self dismissViewControllerAnimated:YES completion:nil];
}];
NSArray *logOutSection = [[NSArray alloc] initWithObjects:logoutItem, nil];
NSArray *customItems = [[NSArray alloc] initWithObjects:logOutSection, nil];
IFFrameAppSettingViewController *settingViewController = [[IFFrameAppSettingViewController alloc] initWithCustomItems:customItems];
10. 如何让App支持修改密码
说明:如果用户是管理员,则任何时候可修改密码;如果服务器是同步数据集或者开启了http认证/ldap认证,则是不支持修改密码的。符合条件后,可以通过如下方式修改密码:
//首先登录
[IFIntegrationUtils logInto:DEFAULT_SERVERNAME serverUrl:url withUsername:username andPassword:password success:^{
	//登录成功后通过此方法获知服务器是否支持修改密码
    if([IFIntegrationUtils canChangePassword]) {
    	//这时候,需要2个参数,原始密码和新密码;这边可以写自己的修改密码让用户输入,比对2次输入是否相同等。假如这边已经拿到原始密码originalPassword和新密码newPassword,则调用
    	[IFIntegrationUtils changePassword:originalPassword newPassword:newPassword success:^{
    		//修改成功
		} failure:^(NSString *message) {
			//修改失败,旧密码有误
		}];
    } else {
    	//服务器不支持修改密码
    }
} failure:^(NSString *msg) {
	//登录失败
}];
11. 如何在集成的App里支持信鸽推送?
第一步:注册信鸽账号
首先需要到信鸽开发中心上注册自己的App,关于证书和程序绑定,上面都会有详细的教程。
注册完成后,会得到三个和App相关的参数:ACCESS ID,ACCESS KEY,SECRET KEY。
客户端需要调用接口来注册程序的ACCESSID和ACESSKEY
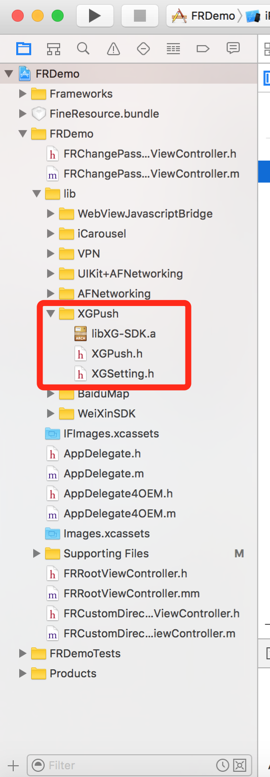
第二步:在自己工程里面,引入信鸽的库"XGPush"
引入的方式,可以参考FRDemo,直接加入工程(也可以通过cocoapods,至于cocoapods怎么管理第三方库,可以自己百度谷歌看看)
第三步:在App中注册信鸽
//AppDelegate.m
//App启动的时候,设置好本机信鸽的access id、access key(第一步中拿到的)
- (BOOL)application:(UIApplication *)application didFinishLaunchingWithOptions:(NSDictionary *)launchOptions {
	[IFOEMUtils setXinGeAppId:123456788];	//access id
	[IFOEMUtils setXinGeAppKey:@"ISHGJ5A7342D"];//accesskey
	//do somethigs
	return YES;
}
如果是OEM集成,客户端做这些就可以了。如果是一般集成,在AppDelegate中还需要做如下注册信鸽的设置:
- (void)application:(UIApplication *)application didRegisterForRemoteNotificationsWithDeviceToken:(NSData *)deviceToken {
	NSString * deviceTokenStr = [XGPush registerDevice:deviceToken];
	[XGPush registerDevice:deviceToken];
	[IFIntegrationUtils setDeviceToken:deviceTokenStr];//必须,在程序里记录设备。
}
- (void)application:(UIApplication *)application didRegisterUserNotificationSettings:(UIUserNotificationSettings *)notificationSettings
{
	[application registerForRemoteNotifications];
}
- (void)application:(UIApplication *)application didReceiveRemoteNotification:(NSDictionary *)userInfo{
	// 处理推送消息
}
第四步:服务器设置
先要给FineReport服务器安装好信鸽插件

安装好后,可以考到这个设置界面
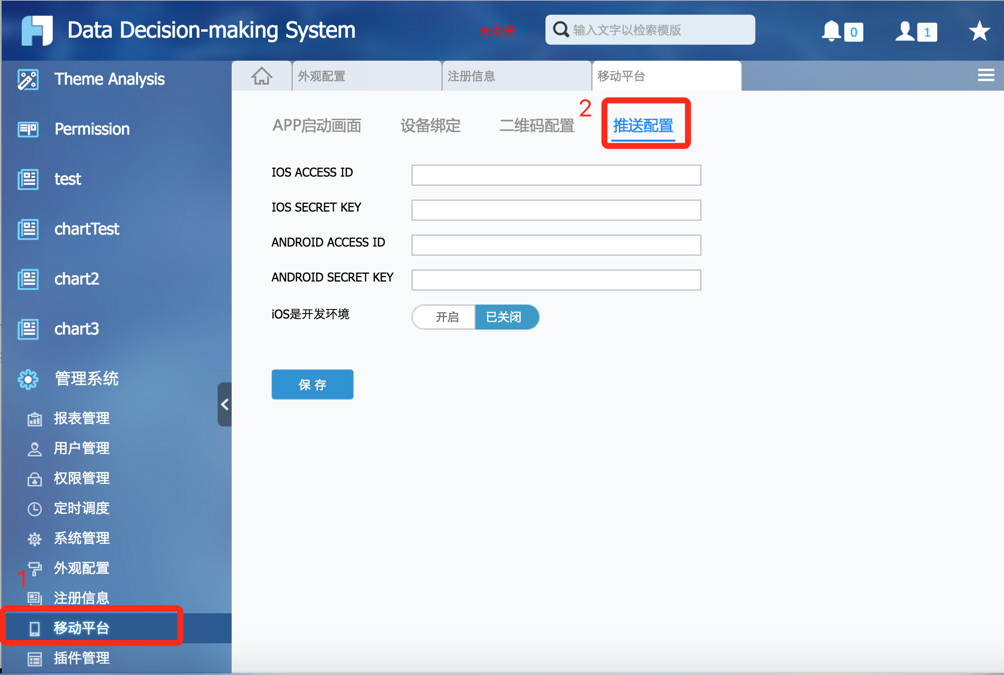
填入iOS用的ACCESS ID 和 secret key ,保存
第五步:测试
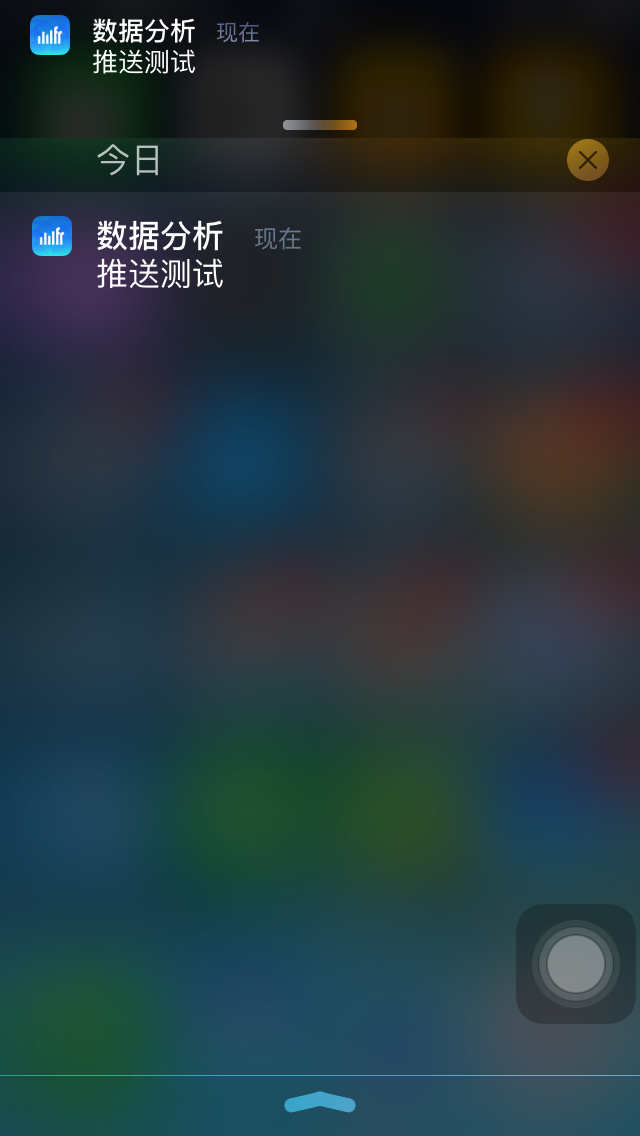
a. 手机登录到服务器(必须是真机)。登录成功后,按home键,让app进入后台(或者锁屏)
b.创建定时调度任务
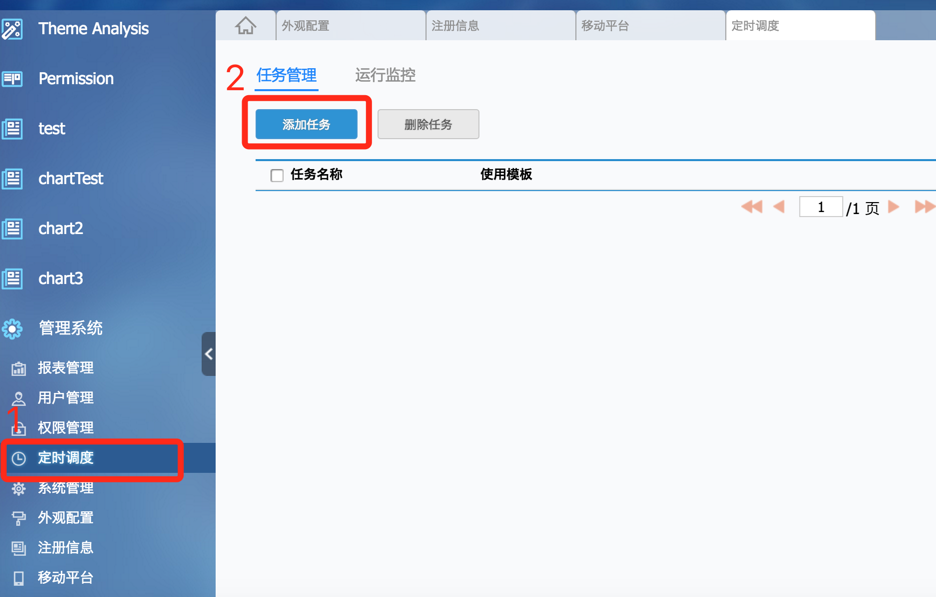
按下方添加定时调度任务

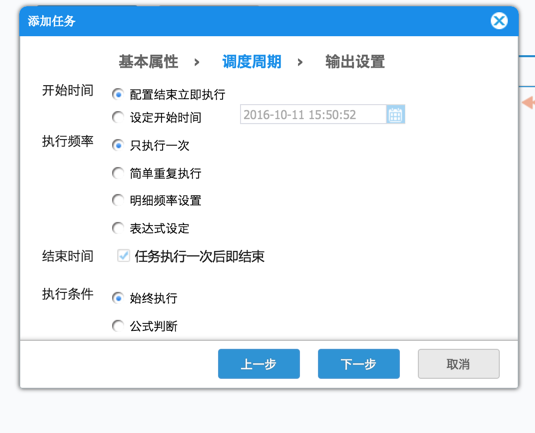
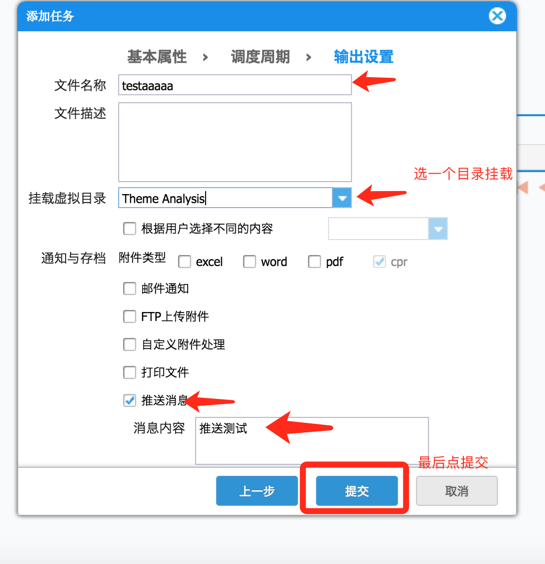
一分钟之内,手机应该会收到如下的消息
12. 如何获取报表在服务器端配置的封面图?
在通过IFIntegrationUtils loadReportTree方法获取到IFEntryNode数组后,对每一个entryNode,使用
[IFIntegrationUtils readEntryImage:entryNode.entryId coverId:entryNode.coverId sucess:^(UIImage *image) {
        //image就是服务器端配置的缩略图,这个方法是做过缓存处理的,不用担心每次都会向服务器发请求。
}];
13. 如何展示非全屏的报表
说明:目前不支持填报报表的非全屏展现,只支持单页分页/表单的展现
IFEntryView *entryView = [[IFEntryView alloc] initWithPath:@"app/DetailedDrillA-phone.cpt" serverUrl:@"http://www.finereporthelp.com:8889/app/ReportServer" viewType:IFEntryViewTypePage parameters:nil];
[entryView setFrame:CGRectMake(0, 64, 800, 600)];
entryView.entryViewDelegate = self;
[self.view addSubview:entryView];
[entryView doLoad];	//加载报表
使用报表视图的对象,需要实现IFEntryViewDelegate中的方法,让报表正常展示
-(void)pushHyperLink:(UIViewController *)viewController withAnimate:(BOOL)animate {
//处理报表View超级链接产生的视图控制器。
}
14. 如何支持国际化
1.打开工程,supporting files目录下新建Localizable.strings国际化基础文件,(demo里面的目前仅支持中文简体,中文繁体及英文语言环境(chinese simple,chinese traditional,english))。 详细教程见:http://blog.sina.com.cn/s/blog_7b9d64af0101jncz.html或者网上搜索ios如何国际化.
2.需要支持国际化的东西,则在对应语言里写上key和翻译就可以。例如:
NSString * myKey = NSLocalizedString(@"MY_KEY",nil);此时,myKey这个字符串在不同语言环境下的key就是"MYKEY".然后去Localizable.strings(english)文件中添加一行"MYKEY"="my key";在Localizable.strings(chinese(simple))文件中添加一行"MYKEY"="我的关键词";同理在繁体文件中添加key对应的翻译。 在不同的语言环境下,myKey显示的文字就是"MYKEY"对应的翻译
15. 集成时APP名称怎么支持国际化
打开工程,在supporting files目录下新建文件,InfoPlist.strings(New File——Resource——String File,命名未InfoPlist.strings),右侧属性里点击Localization,勾选英文,中文简体,中文繁体。在里面添加Key:CFBundleDisplayName,并补充好对应的中英繁文字即可。
16. 如何从外部App启动帆软的数据分析
使用url scheme启动,帆软的url scheme是FineReport或者com.fr.FineReport,运行如下代码即可
启动FRApp
//注意,如果url里有中文或者//这种特殊字符,需要在生成URL之前,做一次encode([string stringByAddingPercentEscapesUsingEncoding:NSUTF8StringEncoding])
NSURL *url = [NSURL URLWithString:@"FineReport://"];
//NSURL *url = [NSURL URLWithString:@"com.fr.FineReport://"]; //也可以这样写
//NSURL *url = [NSURL URLWithString:@"com.fr.FineReport://?serverName=test&serverUrl=xxxxxx&fr_username=a&fr_password=123"]; //传递服务器地址、服务器名、用户名、密码, 注意url特殊字符要encode
//以上参数也可以通过JSON传递,如下
//NSURL *url = [NSURL URLWithString:@"com.fr.FineReport://{\"serverName\":\"xxxxx\", \"serverUrl\":\"http://xxxxx\", \"fr_username\":\"a\", \"fr_password\":\"123\"}"]
//需要注意以下三种情况
//1. serverName已存在,并且serverUrl相同,则使用提供的用户名密码登陆
//2. serverName已存在, 但是serverUrl不同,则会提示"服务器同名"
//3. serverName不存在, 会添加该服务器,并且登陆

[[UIApplication sharedApplication] openURL:url];
在iOS9往后,如果想通过代码判断帆软App是否被正确安装,需要将FineReport和com.fr.FineReport加入scheme白名单中,具体见下图

17.使用微信分享,提示微信未安装
这个问题和第16点其实是一个原因,需要把微信加入白名单

18.使用微信分享,分享到微信后,微信中显示的app信息为“FRDemo”或者“数据分析”
这里首先,需要保证用户有自己的微信appid,用户可以自己去微信申请。appid里会有设置应用名称,图标等信息。
然后在这个地方改成所申请的appid

并在app启动的时候,绑定appid

19.OEM时如何去除设置里的去评分等按钮
第一步,自定义右上设置按钮
自定义设置按钮
UIBarButtonItem *setting = [[UIBarButtonItem alloc] initWithTitle:@"设置" style:UIBarButtonItemStylePlain target:self action:@selector(setting)];

[IFOEMUtils setAppSettingBarButtonItem:setting];
第二步,定义设置按钮事件,打开我们内置的设置界面(不带去评分,联系我们等按钮),但是没有注销按钮(可自己实现)
打开FR设置界面
- (void) setting {
  //定义一个注销按钮
  IFFrameAppSettingItem *logoutItem = [[IFFrameAppSettingItem alloc] initWithTitle:@"注销" andAction:^(UITableViewCell *selectedCell) {
    //注销
    [IFIntegrationUtils logOut];
    //让页面消失,这里需要写一个获取当前最前端视图(当前就是设置界面)的方法,后面会有示例,也可以把设置页面在类里定义成变量能引用到。
    [[self topViewControllerWithRootViewController:[UIApplication sharedApplication].delegate.window.rootViewController] dismissViewControllerAnimated:YES   completion:nil];
  }];

  //把自定义注销按钮放在数组里,后面给创建设置页面使用
  NSArray *logOutSection = [[NSArray alloc] initWithObjects:logoutItem, nil];
  NSArray *customItems = [[NSArray alloc] initWithObjects:logOutSection, nil];

  //定义设置页面
  IIFFrameAppSettingViewController *settingViewController; = [[IFFrameAppSettingViewController alloc] initWithCustomItems:customItems];

  //根据手机/Pad设置不同的弹出方式
  BOOL isPhone = [[UIDevice currentDevice] userInterfaceIdiom] == UIUserInterfaceIdiomPhone;
  UIViewController *topViewController = [self topViewControllerWithRootViewController:[UIApplication sharedApplication].delegate.window.rootViewController];
  if(isPhone) {
    [topViewController.navigationController pushViewController:settingViewController animated:YES];
  } else {
    UINavigationController *navigationController = [[UINavigationController alloc] initWithRootViewController:settingViewController];
    navigationController.modalPresentationStyle = UIModalPresentationFormSheet;
    [topViewController presentViewController:navigationController animated:YES completion:nil];
  }
}
//获取当前顶部视图
- (UIViewController*)topViewControllerWithRootViewController:(UIViewController*)rootViewController {
  if ([rootViewController isKindOfClass:[UITabBarController class]]) {
    UITabBarController* tabBarController = (UITabBarController*)rootViewController;
    return [self topViewControllerWithRootViewController:tabBarController.selectedViewController];
  } else if ([rootViewController isKindOfClass:[UINavigationController class]]) {
    UINavigationController* nav = (UINavigationController*)rootViewController;
    return [self topViewControllerWithRootViewController:nav.topViewController];
  } else if (rootViewController.presentedViewController) {
    UIViewController* presentedViewController = rootViewController.presentedViewController;
    if([presentedViewController isKindOfClass:[UIAlertController class]]) {
      return rootViewController;
    }
    return [self topViewControllerWithRootViewController:presentedViewController];
  } else {
    return rootViewController;
  }
}
效果图如下:

Overview
Content Tools